ChatGPT App Tutorial: Build Your First App in 5 Minutes (July 2026)
ChatGPT App for cooking recipes.
TL;DR: Scaffold a project with npx sunpeak new, create a React resource, connect it to a tool, add a simulation file with mock data, and run the inspector. You will have a working ChatGPT App on localhost in 5 minutes, no paid account required for local development.
A ChatGPT App is a web application that renders inside ChatGPT’s UI. When ChatGPT calls a tool, instead of returning the result as plain text only, your app can render it as interactive UI: cards, forms, charts, whatever you build with React. Under the hood, ChatGPT Apps use the MCP Apps pattern, so the same app architecture can also run on Claude, Goose, VS Code, and other MCP-compatible hosts.
ChatGPT can recommend recipes, but it can only describe them as text. With a ChatGPT App, that same recipe becomes a structured card with prep times, a clickable ingredient list, and numbered steps. The difference between a wall of text and something people actually want to use.
In this tutorial, you will build that recipe card from scratch. By the end, you will have a working app running in a local ChatGPT inspector that you can extend, test, and ship to production.
What Changed Since April 2026
The basic tutorial is the same: tool returns data, resource renders UI, inspector lets you iterate locally. The surrounding ecosystem has moved enough that a July version should be more explicit about a few things.
- MCP Apps now have clearer separation between
content,structuredContent, and_metain tool results. UsestructuredContentfor data both the model and UI can see. Use_metafor UI-only data that should not enter the model transcript. - OpenAI’s Apps SDK docs use MCP concepts directly, including tool descriptors, resource templates, widget metadata, and the host bridge. sunpeak hides most of that setup when you scaffold a project, but knowing the underlying fields helps when you debug production behavior.
- Host portability is worth planning from the first component. Keep core React resources and tools host-neutral, then add ChatGPT-only behavior through
sunpeak/chatgptwhen the app needs it.
Prerequisites
You need Node.js 20 or later and pnpm (npm or yarn work too, but this tutorial uses pnpm). You do not need a ChatGPT account for this local tutorial. sunpeak’s local inspector handles the ChatGPT-style runtime during development, including display modes, theme changes, safe areas, and simulated tool calls.
Step 1: Create a New Project
Scaffold a project:
npx sunpeak newFollow the prompts to configure your project. npx sunpeak new creates a complete project structure with dependencies installed, TypeScript config, a sample resource, simulation files, and a local inspector. It also sets up the testing framework so you can write unit tests, e2e tests, and visual regression tests from the start.
cd into your new project directory before continuing. You should see a src/resources/ directory (where your app code lives) and a tests/simulations/ directory (where mock data lives).
Step 2: Write Your First Resource
A resource is a React component that renders tool data from ChatGPT. Each resource has two parts: a config object that describes it and a component that renders it.
sunpeak auto-discovers resources by directory convention. Any file at src/resources/{name}/{name}.tsx becomes a resource. Create the file src/resources/recipe/recipe.tsx:
import { useToolData, SafeArea } from 'sunpeak';
import type { ResourceConfig } from 'sunpeak';

export const resource: ResourceConfig = {
  title: 'Recipe',
  description: 'Display a recipe with ingredients and steps',
};

interface RecipeData {
  title: string;
  prepTime: string;
  cookTime: string;
  servings: number;
  ingredients: string[];
  steps: string[];
  tags: string[];
}

export function RecipeResource() {
  const { output, isLoading, isError } = useToolData<unknown, RecipeData>();

  if (isLoading) return <div className="p-6 text-gray-400">Loading recipe...</div>;
  if (isError) return <div className="p-6 text-red-500">Failed to load recipe.</div>;
  if (!output) return null;

  return (
    <SafeArea className="p-6 font-sans max-w-lg mx-auto">
      <h1 className="text-2xl font-bold mb-1">{output.title}</h1>

      <div className="flex gap-2 mb-4 mt-2">
        {output.tags.map((tag) => (
          <span key={tag} className="px-2 py-0.5 bg-amber-100 text-amber-800 rounded-full text-xs font-medium">
            {tag}
          </span>
        ))}
      </div>

      <div className="flex gap-3 text-sm mb-6">
        <div className="flex items-center gap-1.5 bg-gray-50 rounded-lg px-3 py-2">
          <span className="text-gray-400">🕐</span>
          <div>
            <div className="text-gray-400 text-xs">Prep</div>
            <div className="font-medium">{output.prepTime}</div>
          </div>
        </div>
        <div className="flex items-center gap-1.5 bg-gray-50 rounded-lg px-3 py-2">
          <span className="text-gray-400">🔥</span>
          <div>
            <div className="text-gray-400 text-xs">Cook</div>
            <div className="font-medium">{output.cookTime}</div>
          </div>
        </div>
        <div className="flex items-center gap-1.5 bg-gray-50 rounded-lg px-3 py-2">
          <span className="text-gray-400">🍽️</span>
          <div>
            <div className="text-gray-400 text-xs">Serves</div>
            <div className="font-medium">{output.servings}</div>
          </div>
        </div>
      </div>

      <div className="grid grid-cols-1 sm:grid-cols-2 gap-6">
        <div>
          <h2 className="text-sm font-semibold uppercase tracking-wide text-gray-400 mb-2">Ingredients</h2>
          <ul className="space-y-1.5">
            {output.ingredients.map((item, i) => (
              <li key={i} className="flex items-start gap-2">
                <span className="mt-1.5 h-1.5 w-1.5 rounded-full bg-amber-400 shrink-0" />
                {item}
              </li>
            ))}
          </ul>
        </div>

        <div>
          <h2 className="text-sm font-semibold uppercase tracking-wide text-gray-400 mb-2">Steps</h2>
          <ol className="space-y-3">
            {output.steps.map((step, i) => (
              <li key={i} className="flex gap-3">
                <span className="flex items-center justify-center h-6 w-6 rounded-full bg-amber-400 text-white text-xs font-bold shrink-0">
                  {i + 1}
                </span>
                <span className="pt-0.5">{step}</span>
              </li>
            ))}
          </ol>
        </div>
      </div>
    </SafeArea>
  );
}
Here’s what each piece does:
resourcetells ChatGPT the name and purpose of your app. sunpeak uses this to register the resource with the MCP server automatically.useToolDatais a React hook that gives your component the data ChatGPT sent. The generic types<unknown, RecipeData>mean we don’t care about the tool input, but we expect the output to match ourRecipeDatashape. It also returnsinput,isLoading,isError, andisCancelledfor handling different states.SafeAreawraps your content with proper insets so it renders correctly across display modes (inline, picture-in-picture, and fullscreen).- The loading and error checks handle the brief moment before data arrives and any failures.
The rest is standard React with Tailwind classes. Nothing framework-specific about the UI itself, which means the same component works on Claude, Goose, VS Code, and other hosts without changes.
If you ever build the server layer by hand, the same concept maps to MCP App resource metadata. The tool result points the host at a UI resource, and the resource renders the tool’s structuredContent. sunpeak handles that wiring for this tutorial so you can focus on the app behavior.
Step 3: Write the Tool
A resource renders the UI. A Tool triggers it. When ChatGPT decides to call your tool, the tool handler runs, returns structured data, and ChatGPT renders your resource with that data.
sunpeak auto-discovers tools from src/tools/*.ts. Create src/tools/show-recipe.ts:
import { z } from 'zod';
import type { AppToolConfig, ToolHandlerExtra } from 'sunpeak/mcp';

export const tool: AppToolConfig = {
  resource: 'recipe',
  title: 'Show Recipe',
  description: 'Look up a recipe and display it',
  annotations: { readOnlyHint: true },
};

export const schema = {
  query: z.string().describe('Recipe name or search term'),
};

type Args = z.infer<z.ZodObject<typeof schema>>;

export default async function (args: Args, _extra: ToolHandlerExtra) {
  // In production, fetch from your recipe API using args.query
  return {
    structuredContent: {
      title: 'Classic Chocolate Chip Cookies',
      prepTime: '15 min',
      cookTime: '12 min',
      servings: 24,
      ingredients: ['2¼ cups flour', '1 cup butter', '2 cups chocolate chips'],
      steps: ['Preheat oven to 375°F.', 'Mix dry ingredients.', 'Bake 9-11 minutes.'],
      tags: ['dessert', 'baking', 'cookies'],
    },
  };
}
Three exports, each with a specific job:
toollinks this tool to the recipe resource and describes it to ChatGPT. Theresourcefield connects it to the component you created in Step 2. Theannotations.readOnlyHinttells the model this tool only reads data (no side effects).schemadefines the tool’s input parameters using Zod. ChatGPT uses the descriptions to decide what arguments to pass. sunpeak converts this to the JSON Schema format that MCP requires.- The default export is the handler that runs when ChatGPT calls the tool. It returns
structuredContentmatching the shape your resource expects. In production, you would replace the hardcoded data with an API call or database query.
When ChatGPT calls show-recipe, the MCP server runs this handler and sends the structuredContent to your RecipeResource component via useToolData.
Keep the tool result contract boring on purpose. structuredContent should match the public data your UI needs and the model can reason about. Put private UI-only data in _meta, such as pagination cursors, signed asset URLs, or row IDs the model should not see. If the shape matters, add an outputSchema so bad data fails before it reaches a host.
Step 4: Add Test Data
The inspector needs mock data to render your resource. This is a simulation file: a JSON file that describes what the user said, what tool ChatGPT called, and what data came back.
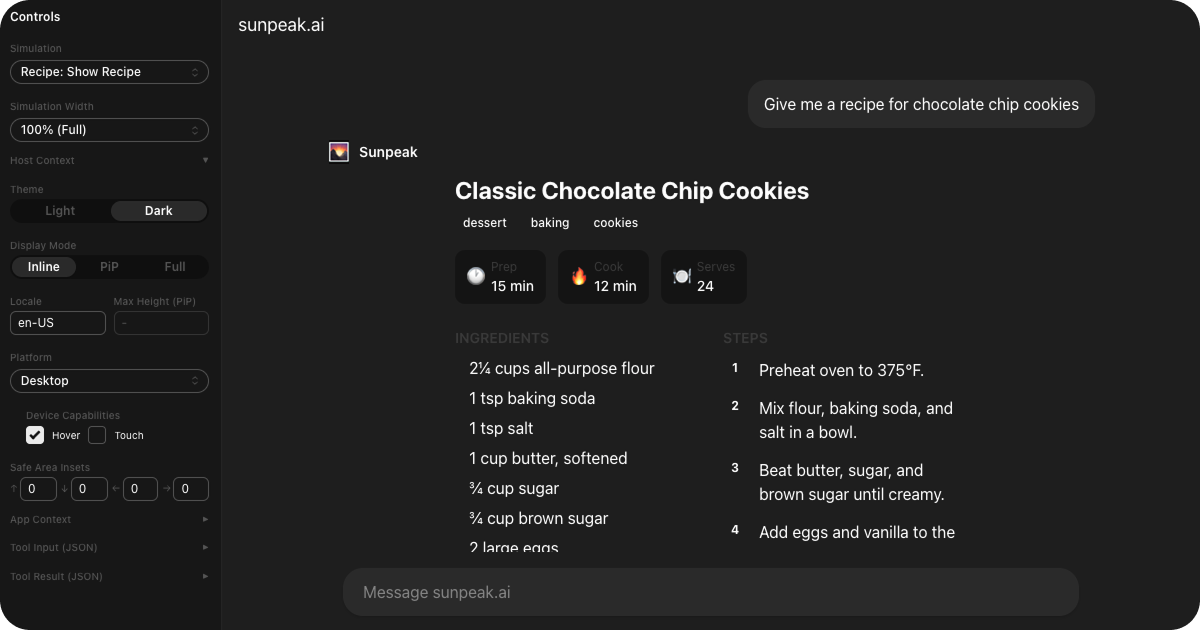
Simulations reference tools by name. Create tests/simulations/recipe-cookies.json:
{
  "tool": "show-recipe",
  "userMessage": "Give me a recipe for chocolate chip cookies",
  "toolInput": {
    "query": "chocolate chip cookies"
  },
  "toolResult": {
    "structuredContent": {
      "title": "Classic Chocolate Chip Cookies",
      "prepTime": "15 min",
      "cookTime": "12 min",
      "servings": 24,
      "ingredients": [
        "2¼ cups all-purpose flour",
        "1 tsp baking soda",
        "1 tsp salt",
        "1 cup butter, softened",
        "¾ cup sugar",
        "¾ cup brown sugar",
        "2 large eggs",
        "2 tsp vanilla extract",
        "2 cups chocolate chips"
      ],
      "steps": [
        "Preheat oven to 375°F.",
        "Mix flour, baking soda, and salt in a bowl.",
        "Beat butter, sugar, and brown sugar until creamy.",
        "Add eggs and vanilla to the butter mixture.",
        "Gradually blend in the flour mixture.",
        "Stir in chocolate chips.",
        "Drop rounded tablespoons onto ungreased baking sheets.",
        "Bake 9 to 11 minutes or until golden brown."
      ],
      "tags": ["dessert", "baking", "cookies"]
    }
  }
}
The key field is toolResult.structuredContent. That object is exactly what useToolData returns as output in your component.
You can create multiple simulation files for the same tool to test different scenarios. For example, a recipe-salad.json with a different recipe lets you switch between test cases in the inspector. This is also how sunpeak’s testing framework works: your unit tests and e2e tests load simulation files to verify your component renders correctly for each case.
Add at least one edge-case simulation before you ship the first version. For this recipe app, useful cases include an empty ingredient list, a long recipe title, a network-style error result, and a recipe with enough steps to require scrolling. These states catch most layout problems faster than testing only the happy path.
Step 5: Run the Inspector
Start the development server:
pnpm devThis launches two servers: the inspector at http://localhost:3000 and the MCP server at http://localhost:8000. Both support hot reloading, so changes to your components and tool handlers reflect immediately.
Open http://localhost:3000. You should see the ChatGPT inspector with your recipe card rendered inside a chat conversation. The user message “Give me a recipe for chocolate chip cookies” appears in the chat, and your component renders the structured recipe below it.
From here, try switching display modes in the inspector toolbar. Your app can render inline inside the chat, fullscreen, or picture-in-picture. Toggle dark mode to check that your Tailwind classes handle both themes. Resize the viewport too, because host containers are often narrower than your normal browser window.
How It Works
The data flow in a ChatGPT App follows the MCP Apps pattern:
- The user asks ChatGPT something (“Give me a recipe for cookies”).
- ChatGPT decides to call a tool (
show-recipe). Your MCP server executes the tool handler and returns structured data. - ChatGPT passes that data to your resource component via
structuredContent. The resource runs in a sandboxed iframe inside the ChatGPT UI. - Your component receives it through
useToolDataand renders it as UI.
Your resource is pure UI. It usually should not call private APIs or run server logic directly. ChatGPT handles the model side, your MCP server handles data access, and your resource handles presentation. This separation is why MCP Apps are portable across hosts: the same component works in ChatGPT, Claude, Goose, VS Code, Postman, and MCPJam from a single codebase. The MCP Apps introduction covers this architecture in detail.
During development, the simulation file stands in for ChatGPT. In production, real tool calls from ChatGPT replace the mock data, and your component renders identically because the data shape is the same.
Before You Ship It
The tutorial app is intentionally small, but the same checklist applies to a production ChatGPT App.
- Validate every tool input and output shape. Zod schemas help the model call the right tool, and output schemas help prevent malformed
structuredContentfrom breaking your UI. - Test display modes, dark mode, narrow widths, loading states, error states, and cancelled states. Host containers are not the same as a full browser tab.
- Keep secrets and private IDs out of
structuredContent. Use_metafor UI-only data, and keep server-only data on the MCP server. - Run local tests first, then live-host tests against the real host flow before submission.
- Document what the tool does in plain language. Tool descriptions and schema descriptions are part of how the model decides when to call your app.
Make It Your Own
A few ideas to try now that you have a working app.
Add state with useAppState
Let the user check off ingredients as they cook. useAppState works like useState but syncs state back to ChatGPT, so the model knows what the user has done.
import { useToolData, useAppState, SafeArea } from 'sunpeak';

// Inside your component:
const [checked, setChecked] = useAppState<Record<number, boolean>>({});

// Then in your ingredients list:
{output.ingredients.map((item, i) => (
  <li key={i}
    className={`flex items-start gap-2 cursor-pointer ${checked[i] ? 'line-through text-gray-400' : ''}`}
    onClick={() => setChecked({ ...checked, [i]: !checked[i] })}
  >
    <span className={`mt-1.5 h-1.5 w-1.5 rounded-full shrink-0 ${checked[i] ? 'bg-gray-300' : 'bg-amber-400'}`} />
    {item}
  </li>
))}
Respond to display mode
Use useDisplayMode to adjust your layout when the user switches from inline to fullscreen. The display mode reference covers every mode and its CSS behavior.
Add host-aware styling
Your app inherits CSS variables from the host for theme-aware styling. Use useTheme to read whether the user is in light or dark mode and adjust colors accordingly.
Write tests
sunpeak includes a full testing framework. Write unit tests with Vitest to verify your component renders correctly for each simulation. Add snapshot tests to catch unintended UI changes. Run pnpm test:unit to execute them locally, or set up CI/CD to run them on every push.
Add another resource
Create src/resources/meal-plan/meal-plan.tsx with a weekly meal planner UI. Each resource is independent, and sunpeak auto-discovers new ones from the directory structure.
Get Started
npx sunpeak newFurther Reading
- ChatGPT App framework
- MCP App framework
- MCP testing framework
- How to run your ChatGPT App locally - inspector, simulations, and dev server
- How to Build an MCP App - cross-host architecture guide
- Complete guide to testing ChatGPT Apps - unit, e2e, visual, and live tests
- MCP App tool results - content, structuredContent, and _meta
- MCP App outputSchema - validate structuredContent before hosts see it
- ChatGPT App display mode reference - inline, PiP, and fullscreen
- Interactive MCP Apps with useAppState - two-way state management
- Debugging ChatGPT Apps - common runtime and bridge errors
- sunpeak quickstart
- sunpeak MCP Apps documentation
- OpenAI Apps SDK reference
- Official MCP Apps documentation
Frequently Asked Questions
Do I need a paid ChatGPT account to build a ChatGPT App?
No. sunpeak includes a local ChatGPT inspector that replicates the ChatGPT App runtime for development. You can build, test, and iterate on localhost without a paid ChatGPT account or host credits. For live testing, Developer mode must be enabled from the user component in the bottom-left corner under Settings > Security and login > Developer mode. Then open Plugins from the ChatGPT sidebar, select an existing app, or use + to add one.
What is the fastest way to start building a ChatGPT App in 2026?
Run "npx sunpeak new" to scaffold a project, then cd into the directory and run "pnpm dev" to launch the local inspector at localhost:3000 and the MCP server at localhost:8000. You can have a working ChatGPT App running in a couple of minutes. The scaffolded project includes a sample resource, tool, simulation file, and test setup.
What is a resource in a ChatGPT App?
A resource is a React component paired with metadata that tells the host what UI to render. It receives tool result data, usually structuredContent, and renders that data as interactive UI inside the chat. Each resource lives in its own directory under src/resources/ and is auto-discovered by sunpeak. Under the hood, sunpeak registers an MCP App resource URI so the same resource can run in ChatGPT, Claude, and other MCP-compatible hosts.
What is a simulation file and why do I need one?
A simulation file is a JSON file in tests/simulations/ that contains mock tool data for local development. It defines what the user said, what tool ChatGPT called, and what data the tool returned. The sunpeak inspector loads these files so you can develop and test your UI across all states without connecting to a real ChatGPT session. Multiple simulation files for the same tool let you test different scenarios like loading states, error states, and edge cases.
How does useToolData work in a ChatGPT App?
useToolData is a React hook from sunpeak that gives your component access to the data ChatGPT sends when it calls a tool. You call it with optional type parameters for the tool input and output shapes. It returns output, input, isLoading, isError, isCancelled, and other status fields. Your component renders output as UI. The same hook works across ChatGPT, Claude, and other MCP App hosts.
Can I use Tailwind CSS in a ChatGPT App?
Yes. sunpeak projects include Tailwind CSS by default. You can use Tailwind utility classes in your resource components. ChatGPT Apps also have access to CSS variables from the host for theme-aware styling, such as --color-background-primary, --color-text-primary, --font-sans, and --border-radius-md. sunpeak provides a useTheme hook that returns "light" or "dark" so you can conditionally style elements.
How do I test a ChatGPT App locally?
Run "pnpm dev" to start the local inspector at localhost:3000. The inspector loads your simulation files and renders your resources exactly as ChatGPT would. You can test different display modes (inline, fullscreen, picture-in-picture), themes (light, dark), and screen sizes. For automated testing, sunpeak includes a full testing framework: "pnpm test:unit" for unit tests, "pnpm test" for e2e tests, and "pnpm test:visual" for visual regression tests, all running without a ChatGPT account.
What is the difference between a ChatGPT App and an MCP App?
A ChatGPT App is an MCP App that runs inside ChatGPT. MCP Apps define how interactive resources, tool results, and host bridges work across AI hosts. When you build with sunpeak, you build a portable MCP App first, then add ChatGPT-specific behavior through sunpeak/chatgpt imports when you need it. That keeps the base app usable across ChatGPT, Claude, Goose, VS Code, Postman, MCPJam, and other MCP-compatible hosts.
How do I deploy a ChatGPT App to production?
Run "pnpm build && pnpm start" to compile and launch the production MCP server. For live testing, enable Developer mode from the user component in the bottom-left corner under Settings > Security and login > Developer mode. Then open Plugins from the ChatGPT sidebar, select the existing app, or use + to add one. For public distribution, submit the production MCP server as a With MCP plugin in the OpenAI Platform.
