How to Run Your ChatGPT App Locally (July 2026)
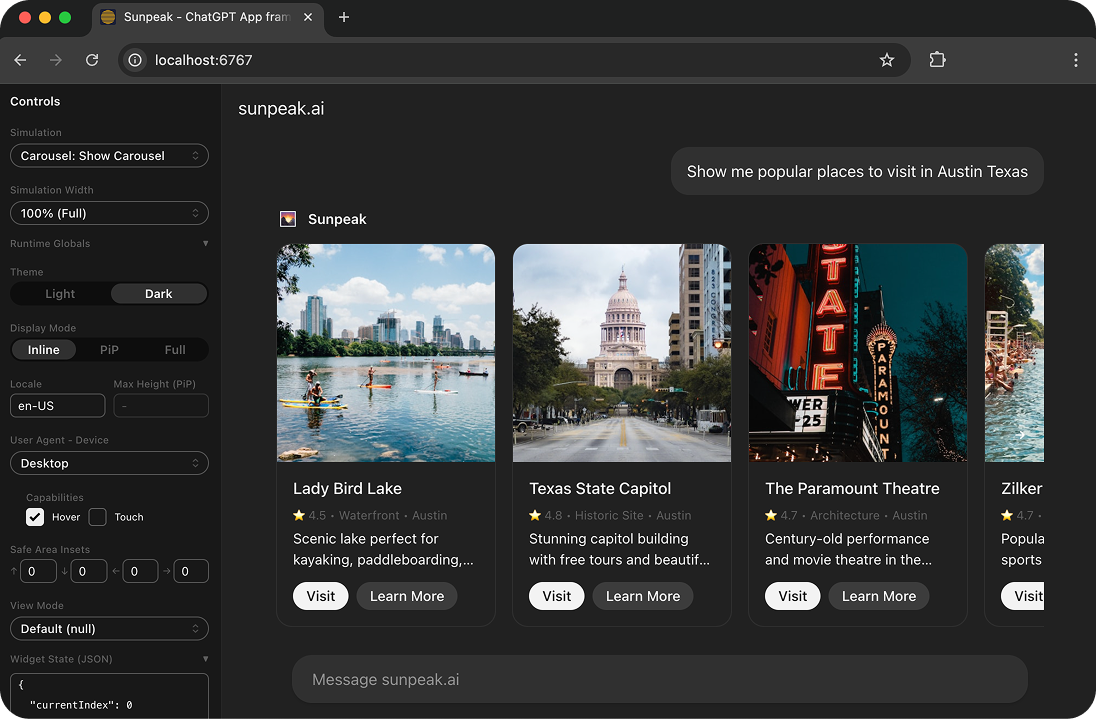
The sunpeak Inspector replicating the ChatGPT App runtime locally.
You can build a useful ChatGPT App before you ever connect it to ChatGPT. The fastest local loop is to run your MCP server on your machine, render the app in a local host runtime replica, and only connect to the real host when the UI, tool contract, and tests are already in good shape.
With sunpeak, that loop is one command after setup. The Inspector runs locally, renders your ChatGPT App in a replicated MCP App host, and lets you test display modes, themes, mock tool responses, and automated browser flows without spending host credits or refreshing a live connector after every edit.
TL;DR: Run npx sunpeak new sunpeak-app, then cd sunpeak-app && pnpm dev. Open localhost:3000 to test your ChatGPT App locally. Use a tunnel and ChatGPT Developer Mode only when you are ready to live-test the same MCP endpoint in ChatGPT.
What You Are Running Locally
A ChatGPT App is an MCP App: a tool-backed UI that an AI host can render inside a conversation. The important pieces are:
- An MCP server that exposes tools and resources.
- Tool definitions that tell the host what the model can call.
- App resources, usually HTML, that render inside a sandboxed iframe.
- Tool results that pass model-visible data through
structuredContentand app-only data through_meta. - A host bridge that lets the iframe read host context and request supported actions.
For new cross-host work, treat the MCP Apps metadata as the portable contract. A UI tool should point at its app resource with _meta.ui.resourceUri. If you also need older OpenAI compatibility keys, mirror the same resource URI there, but keep the standard field as your source of truth. The same rule applies to visibility and app-only data: prefer standard MCP Apps fields first, then add compatibility fields only when a host requires them.
That local contract matters because most ChatGPT App bugs are contract bugs. The tool runs but no UI appears. The UI loads but has no data. The app works inline but breaks fullscreen. The model can see data it should not see, or the app cannot access data it needs. A good local loop catches those before you involve the real host.
Create a Local ChatGPT App Project
You need Node.js 20 or newer. Create a project:
npx sunpeak new sunpeak-appThen start the dev server:
cd sunpeak-app
pnpm dev
The generated project gives you the pieces you need for local ChatGPT App development:
sunpeak-app/
├── src/
│   ├── resources/     # React app resources rendered in the host iframe
│   ├── tools/         # Tool handlers, schemas, and UI links
│   └── server.ts      # MCP server setup
├── tests/
│   ├── simulations/   # Repeatable app and tool states
│   ├── e2e/           # Playwright tests against the Inspector
│   └── evals/         # Model/tool-calling evals
└── package.json
pnpm dev starts your MCP server and the local Inspector. In a default sunpeak project, the Inspector is available at localhost:3000, and the MCP endpoint is served from the local dev server. If your project prints different ports, follow the terminal output, because local port conflicts can change the assigned port.
Inspect an Existing MCP Server
You do not have to scaffold a new app to use the local Inspector. If you already have an MCP server, point sunpeak at it:
npx sunpeak inspect --server http://localhost:8000/mcpThis is useful when your backend is already written in another stack. You can keep the server you have, then use sunpeak to inspect tools, render app resources, test host state, and build repeatable simulations around real MCP responses.
Use this mode for three common cases:
- You have an existing MCP server and want to add a ChatGPT App UI.
- You are debugging why a tool result does not render an app resource.
- You want automated tests around host behavior without moving your server code.
Develop in the Inspector
The sunpeak Inspector is the local workbench for ChatGPT App development. It renders your app like a host would, but it keeps the development loop under your control.
Use it to check:
- Inline, fullscreen, and picture-in-picture display modes.
- Light and dark themes.
- Host context, viewport size, and safe-area behavior.
- Tool results with realistic
structuredContentand_metapayloads. - Loading, empty, partial, and error states.
- App actions that call server tools or ask the host to change display mode.
The best local habit is to create simulations for the states you know users will hit. Do not only test the happy path. A local ChatGPT App should have a saved state for the empty result, a large result, an auth error, a slow response, and any user-specific data that changes the UI. Those states become test fixtures later, so the work you do while debugging becomes part of your regression suite.
Verify the Tool and Resource Contract
Before you debug React, verify the MCP contract. A working ChatGPT App needs the host to discover the tool, call it with valid arguments, find the matching resource, and pass the right data into the iframe.
Check these items locally:
- The tool appears in
tools/listwith the expected name, description, input schema, and annotations. - The tool definition points to the UI resource with
_meta.ui.resourceUri. - The resource URI exists in
resources/listand can be read withresources/read. - The resource uses an MCP App-compatible HTML media type.
- The tool result returns
structuredContentfor data the model may use. - The tool result keeps app-only data in
_meta. - Compatibility keys, if present, point at the same resource as the standard MCP Apps metadata.
If the app appears in the Inspector but not in ChatGPT, the mismatch is often in this layer. Local inspection narrows the problem before you spend time refreshing a live connector.
Add Automated Tests
Manual local testing is good for shaping the app. Automated tests keep it from drifting.
Start with the default test command:
pnpm testThen add focused tests as the app grows:
pnpm test:visual
pnpm test:eval
Use simulation fixtures to pin the data contract. Use Playwright to verify the iframe renders the right controls and responds to user input. Use visual regression tests for layout-sensitive views, especially if your app supports more than one display mode. Use evals when you need to know whether the model calls the right tool with the right arguments.
A practical local matrix looks like this:
| Area | What to test locally |
|---|---|
| Tool contract | Tool schema, annotations, _meta.ui.resourceUri, result shape |
| Data flow | structuredContent, app-only _meta, loading and error states |
| Host state | Theme, display mode, viewport, safe areas |
| UI behavior | Forms, filters, actions, disabled states, retry paths |
| Regression | E2E tests, visual snapshots, model/tool-calling evals |
That matrix gives you coverage where ChatGPT Apps tend to fail: not only in the component, but in the agreement between the model, tool, resource, iframe, and host bridge.
Connect the Local Server to ChatGPT
When your local app is ready for live testing, expose the MCP endpoint with a tunnel:
ngrok http 8000Use the port your local server actually prints. If your MCP endpoint is /mcp, the tunneled URL should look like:
https://example.ngrok-free.dev/mcpDeveloper mode is required to add a custom app. If needed, open the user component in the bottom-left corner, then go to Settings > Security and login > Developer mode. After it is enabled:
- Open Plugins from the ChatGPT sidebar.
- Select an existing development app, or use the + button to add one.
- If adding an app, complete the form with your tunneled
/mcpendpoint. - Start a new chat and invoke a tool from your app.
For live testing, keep the Inspector open next to ChatGPT. The Inspector gives you faster state changes, while ChatGPT confirms the real host path. If a change works locally but not in ChatGPT, refresh the development app from the Plugins page, confirm the tunnel still points at the current server, and re-check the tool/resource metadata.
Debug Common Local Issues
If the app does not render, start at the server boundary.
Is the MCP endpoint reachable?
curl http://localhost:8000/mcpIf the server is running but the app does not appear, inspect the tool metadata and resource URI. The most common problem is a tool result that returns useful data but does not point the host at a UI resource.
If the iframe loads but the app has no data, compare the simulation payload with the live tool result. Check whether the app reads from structuredContent, _meta, or a hook such as useToolData. Also confirm that private data stays in _meta if the model should not see it.
If display mode behavior is wrong, test each mode explicitly. Inline views should be compact and scannable. Fullscreen views can use more controls, tables, and dense layouts. Picture-in-picture views need to survive narrow sizing and limited interaction space.
If a live ChatGPT development app stops working, check the tunnel first. Tunnels expire, URLs change, local servers restart, and workspace Developer mode settings can change. Local tests do not remove the need for one live check, but they should make that live check boring.
Prepare for Production
Before you deploy, run the same checks you used locally:
pnpm build
pnpm test
Then confirm:
- The production MCP endpoint uses HTTPS.
- Auth is handled at the MCP server boundary.
- Tool descriptions are clear enough for the model to choose the right tool.
- Tool input schemas reject bad arguments.
- App resources do not depend on localhost-only URLs.
- CSP and allowed domains include the APIs and assets your iframe needs.
- The app has tested states for empty data, partial data, auth errors, and server errors.
If you are using sunpeak, keep the same simulations and E2E tests in CI. The local Inspector is useful during development, but its bigger value is that you can test the ChatGPT App contract automatically on every change.
The Local Workflow
For most teams, the right loop is:
- Build and inspect locally.
- Save real app states as simulations.
- Add Playwright and visual tests around those states.
- Live-test in ChatGPT only after the local contract passes.
- Keep those tests in CI so the app does not regress after launch.
That saves time because ChatGPT App development has several moving parts: the MCP server, tool schema, resource metadata, iframe UI, host bridge, and model behavior. Local testing lets you isolate each one instead of debugging everything through a live chat.
Start with the sunpeak quickstart, read the ChatGPT App framework overview, or follow the full ChatGPT App tutorial if you want a complete project from first command to deployment.
Get Started
npx sunpeak newFurther Reading
- ChatGPT App tutorial - build a complete app from setup to deployment
- Complete guide to testing ChatGPT Apps
- ChatGPT App display mode reference
- MCP App tool _meta and resource URI visibility
- How to deploy an MCP App to production
- ChatGPT App framework - sunpeak overview
- sunpeak quickstart guide
- OpenAI Apps SDK quickstart
- MCP Apps specification
Frequently Asked Questions
How do I run a ChatGPT App locally in 2026?
Create a sunpeak project with "npx sunpeak new", run "pnpm dev", then open localhost:3000. sunpeak starts an MCP server, serves your app resources, and opens the Inspector so you can test the ChatGPT App runtime locally before connecting to ChatGPT.
Do I need ChatGPT Developer Mode to build a ChatGPT App locally?
No. Developer Mode is only needed when you want to connect your local MCP server to the real ChatGPT host. For local development, sunpeak runs a replicated ChatGPT App runtime in the Inspector, so you can build UI, test tool calls, verify display modes, and run automated tests without a ChatGPT account.
What ChatGPT account do I need for live testing a local MCP app?
When live testing is available in your workspace, expose the local MCP endpoint with a tunnel. Developer mode is required to add a custom app. Enable it from the user component in the bottom-left corner under Settings > Security and login > Developer mode. Then open Plugins from the ChatGPT sidebar, select the existing app, or use + to add one.
What is the sunpeak Inspector for ChatGPT App development?
The sunpeak Inspector is a local host runtime replica for MCP Apps. It renders app resources in a sandboxed iframe, lets you switch host, theme, display mode, and viewport state, feeds deterministic mock tool data into the app, and hot-reloads changes while you build.
Can I test an existing MCP server without creating a new sunpeak project?
Yes. Run "npx sunpeak inspect --server <url>" against an existing MCP server. This is useful when your backend already exists and you want a local ChatGPT-style inspector for resources, tools, tool results, and host bridge behavior.
What metadata should a ChatGPT App tool return so the UI renders?
For new cross-host MCP Apps, use the standard MCP Apps metadata shape. Tool definitions should point to UI resources with _meta.ui.resourceUri, and tool results should return structuredContent for model-visible data plus _meta for app-only data. Older OpenAI-specific compatibility keys can mirror the same values when you need them, but the standard MCP Apps fields should be the source of truth.
How do I test a ChatGPT App automatically?
Use sunpeak tests against the local Inspector. Simulation files create repeatable tool states, Playwright tests verify the rendered iframe, visual tests catch UI drift, live-host tests can confirm real ChatGPT behavior when you have access, and evals can check whether models call the right tools with the right arguments.
Can one local app work in ChatGPT and Claude?
Yes, if you build against the MCP Apps standard and keep host-specific features isolated. sunpeak lets you test the same app against replicated ChatGPT and Claude runtimes so you can catch differences in display mode, theme, bridge state, safe areas, and tool behavior before shipping.