The Complete Guide to Testing ChatGPT Apps and MCP Apps (June 2026)
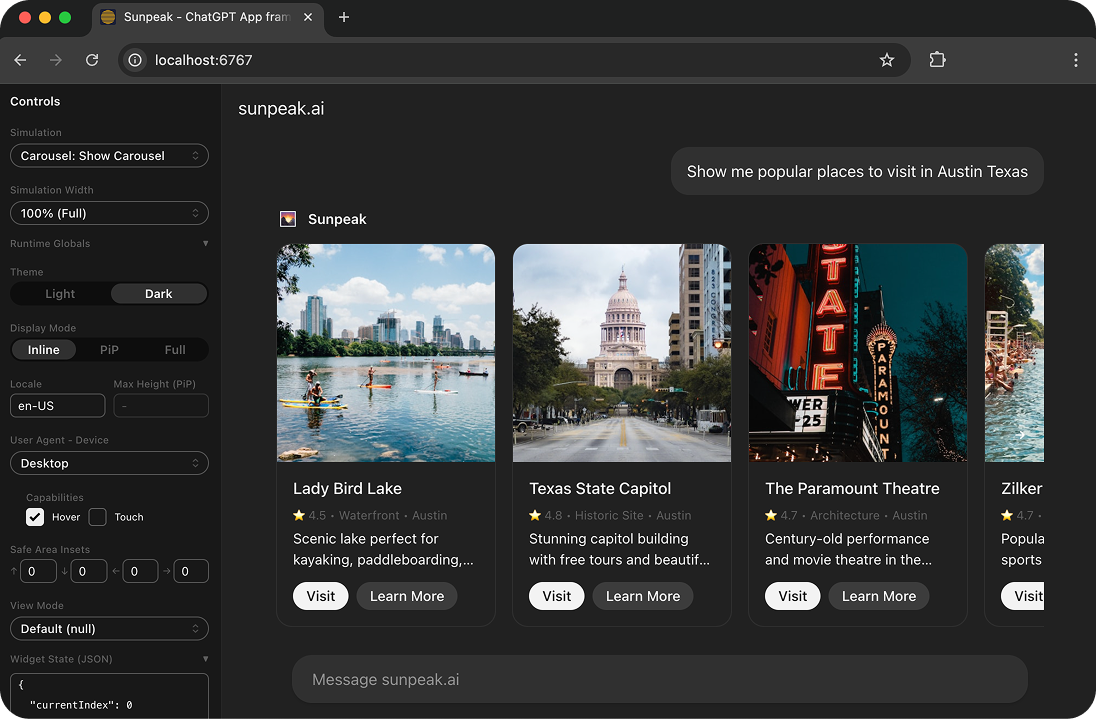
The sunpeak ChatGPT App inspector with testing capabilities.
[Updated 2026-06-14] Testing ChatGPT Apps and MCP Apps is harder than testing a normal web app. Your app needs to work across host runtime state, theme state, MCP server state, backend state, approval state, and model-driven tool inputs. It also needs to work across ChatGPT, Claude, and any other MCP Apps host that supports interactive UI.
Without proper testing infrastructure, you end up deploying blind or spending hours refreshing real host sessions. That is slow, expensive, and hard to repeat in CI.
TL;DR: Use sunpeak’s testing framework. In a sunpeak project, pnpm test runs unit and E2E tests. For any existing MCP server, npx sunpeak test init --server http://localhost:8000/mcp scaffolds tests without requiring a sunpeak app rewrite. Use sunpeak test --e2e for Playwright tests against the inspector, --visual for screenshot regression, --live for real host checks, and --eval for multi-model tool calling evals. The inspector fixture calls your MCP tools, renders the result in simulated ChatGPT and Claude runtimes, and gives you a scoped app frame for assertions. Keep fast inspector tests in every pull request, then run live tests and evals on a slower, opt-in path.
This guide covers the test stack I would use for a production ChatGPT App or cross-host MCP App in June 2026.
What Changed Since April 2026
MCP Apps moved from a host-specific pattern to a shared standard. The official MCP Apps extension defines how tools point at UI resources, how hosts render those resources in sandboxed iframes, and how the iframe talks back to the host over JSON-RPC messages. The MCP maintainers announced MCP Apps as the first official MCP extension in January 2026, with support across hosts including Claude, ChatGPT, Goose, and Visual Studio Code Insiders.
OpenAI’s Apps SDK reference now tells developers to prefer MCP Apps standard fields and the ui/* bridge by default. ChatGPT still supports window.openai and OpenAI-specific _meta fields for compatibility, but the portable path is _meta.ui.resourceUri, standard tool result shapes, and the MCP Apps bridge.
That matters for testing because your app is no longer just a ChatGPT widget. It is an MCP tool plus an MCP UI resource, and each host can differ in layout, theme, iframe policy, bridge timing, display mode support, and approval flow. A useful test suite needs to check the protocol contract, the rendered UI, and the model-facing tool descriptions.
Why Testing ChatGPT Apps is Different
ChatGPT Apps run in a specialized runtime environment. Your React components don’t just render in a browser. They render inside the ChatGPT App runtime with:
- Host frontend state - Inline, in picture-in-picture, and fullscreen display modes, light or dark theme, etc.
- Tool invocations - The AI host calls your app’s tools with specific inputs
- Backend state - Various possible states for users and sessions in your database
- App state - Persistent state that survives across invocations
- Multiple hosts - ChatGPT and Claude each have their own UI chrome, color palette, layout conventions, and rendering behavior
Testing each combination manually isn’t feasible, the combinatorics are brutal.
The Cross-Host Problem
MCP Apps run on ChatGPT, Claude, and other hosts. Each host renders your app differently. Your app needs to look right in both.
Testing manually against the real hosts means:
- Paid host accounts for every teammate who needs to test
- Possible model or usage costs, because real host testing routes through model-driven tool calls
- Waiting for the model to respond before you can see your component render
- Harder CI/CD automation, since real host sessions are slower and less deterministic than local inspector tests
During active development, you might test dozens of times a day. Across a team, those manual checks add up quickly, and they still do not give you repeatable regression coverage.
sunpeak’s inspector ships both a ChatGPT host and a Claude host built-in. Switch between them with the host dropdown in the sidebar, or pass ?host=claude in the URL. Your automated tests run against both hosts on every push, on your CI/CD runners, with zero external dependencies. No paid accounts, no API keys, no credits.
Setting Up Your Testing Environment
If you’re using the sunpeak ChatGPT App framework, testing is pre-configured. Start with:
npx sunpeak new sunpeak-app
cd sunpeak-app
Your project includes:
- E2E tests powered by Playwright with the
inspectorfixture fromsunpeak/test - Unit tests powered by Vitest with happy-dom
- Simulation files in
tests/simulations/for deterministic states - Eval scaffolding in
tests/evals/for multi-model tool calling tests - Live test scaffolding in
tests/live/for real host checks
The Playwright config is a one-liner:
// playwright.config.ts
import { defineConfig } from 'sunpeak/test/config';
export default defineConfig();
This handles dev server startup, port allocation, and multi-host project setup automatically.
If you already have an MCP server in Python, Go, Rust, TypeScript, or another stack, you can still use the same testing layer:
npx sunpeak test init --server http://localhost:8000/mcp
npx sunpeak test
For non-JavaScript projects, sunpeak creates a self-contained test project under tests/sunpeak/. That gives you Playwright E2E tests, visual regression tests, eval boilerplate, and live test scaffolding without moving your server into the sunpeak framework.
The Test Matrix That Actually Matters
Do not try to test every possible state in one giant test suite. Split the risk into layers:
| Layer | What it catches | Run cadence |
|---|---|---|
| Unit tests | Component logic, hooks, formatters, validation | Every save or every PR |
| MCP contract tests | Tool schemas, tool results, resource reads, annotations | Every PR |
| Inspector E2E tests | Rendered UI, nested iframe behavior, host switching | Every PR |
| Visual regression | Layout drift across hosts, themes, display modes | Every PR for UI-heavy apps |
| Live host tests | Real ChatGPT or Claude connection issues | Before release or nightly |
| Evals | Model tool choice and argument reliability | Before release, after tool description changes |
Most teams should make inspector E2E tests their default safety net. They are deterministic, fast enough for CI, and do not require a paid host account. Live tests and evals are still valuable, but they have external dependencies, so they should confirm release readiness rather than block every local edit.
Unit Testing with Vitest
Unit tests validate individual components in isolation. Run them with:
pnpm test:unitCreate tests alongside your components in src/resources with the .test.tsx extension:
import { render, screen } from '@testing-library/react';
import { Counter } from '../src/resources/counter/counter';

describe('Counter', () => {
  it('renders the initial count', () => {
    render(<Counter />);
    expect(screen.getByText('0')).toBeInTheDocument();
  });

  it('increments when button is clicked', async () => {
    render(<Counter />);
    await userEvent.click(screen.getByRole('button', { name: /increment/i }));
    expect(screen.getByText('1')).toBeInTheDocument();
  });
});
Unit tests run fast and catch component-level bugs early. They’re ideal for testing:
- Component rendering logic
- User interactions within a component
- Props and state handling
MCP Contract Testing
Before you render a UI, test the MCP contract. A ChatGPT App can fail before React loads if the tool schema is wrong, the tool result omits structuredContent, the resource URI is missing, or the host cannot read the UI resource.
Use the mcp fixture from sunpeak/test for protocol-level checks:
import { test, expect } from 'sunpeak/test';

test('search tool exposes a UI resource and valid output', async ({ mcp }) => {
  const tools = await mcp.listTools();
  const search = tools.tools.find((tool) => tool.name === 'search');

  expect(search?._meta?.ui?.resourceUri).toBe('ui://resources/search');

  const result = await mcp.callTool('search', { q: 'headphones' });
  expect(result.isError).toBeFalsy();
  await expect(result).toHaveStructuredContent({
    results: expect.any(Array),
  });
});
Contract tests should cover:
- Tool names, descriptions, annotations, and JSON Schema inputs
outputSchemawhen a tool returnsstructuredContent_meta.ui.resourceUrifor tools that render UI_meta.ui.visibilitywhen a tool should be model-only, app-only, or available to both- Resource reads, MIME type, CSP metadata, and app origin policy
- Error results, cancelled calls, and empty states
These tests are cheap and catch mistakes that visual tests will report later in a less direct way.
End-to-End Testing with the inspector Fixture
E2E tests validate your ChatGPT App running in the inspector. Run them with:
pnpm test:e2eCreate tests in tests/e2e/ with the .spec.ts extension:
import { test, expect } from 'sunpeak/test';

test('counter increments in fullscreen mode', async ({ inspector }) => {
  const result = await inspector.renderTool('show-counter', undefined, {
    displayMode: 'fullscreen',
    theme: 'dark',
  });
  const app = result.app();

  await app.locator('button:has-text("increment")').click();
  await expect(app.locator('text=1')).toBeVisible();
});
The inspector fixture handles inspector navigation, double-iframe traversal, and host selection. The inspector.renderTool() method accepts:
- First arg - Tool name (matches your tool file in
src/tools/) - Second arg - Tool arguments (usually
{}when using simulation data) - Third arg - Display options:
theme,displayMode,prodResources
result.app() returns a Playwright FrameLocator scoped to your resource component.
Tests automatically run against both ChatGPT and Claude hosts via Playwright projects. You don’t need to loop over hosts manually. When a test fails on Claude but passes on ChatGPT (or vice versa), the test name tells you which host had the issue.
sunpeak also provides MCP-native assertion matchers:
toBeError()- Assert that a tool call returned an errortoHaveTextContent()- Assert text content in the tool resulttoHaveStructuredContent()- Assert structured content in the tool result
Creating Simulation Files
Simulation files define deterministic states for testing. Create them in tests/simulations/:
{
  "tool": "show_counter",
  "userMessage": "Show me a counter starting at 5",
  "toolInput": {
    "initialCount": 5
  },
  "toolResult": {
    "content": [{ "type": "text", "text": "Counter displayed" }],
    "structuredContent": {
      "count": 5
    }
  },
  "serverTools": {
    "save_counter": {
      "structuredContent": {
        "saved": true
      }
    }
  }
}
This simulation:
- References the
toolfile to mock by name (matchessrc/tools/show_counter.ts) - Shows
userMessagein the inspector chat interface - Sets
toolInputwith mock input accessible viauseToolData() - Provides
toolResultwith mock output data passed to your component viauseToolData() - Mocks app-initiated server tool calls through
serverTools
Use simulations to test specific states without manual setup:
import { test, expect } from 'sunpeak/test';

test('counter shows initial value of 5', async ({ inspector }) => {
  const result = await inspector.renderTool('show-counter');
  const app = result.app();
  await expect(app.locator('text=5')).toBeVisible();
});
Good simulation coverage usually includes:
- A happy path with realistic production-sized data
- Empty data, partial data, and pagination boundaries
- Backend errors and tool errors
- Approval-gated tools where input arrives after the iframe mounts
- Slow or pending states when the UI starts before all data is available
- App-only tool calls from the iframe back to the MCP server
The goal is not to mirror your database. The goal is to pin every UI state that could break in a host iframe.
Testing Across Display Modes
ChatGPT Apps appear in three display modes. Test all of them:
import { test, expect } from 'sunpeak/test';

const displayModes = ['inline', 'pip', 'fullscreen'] as const;

for (const displayMode of displayModes) {
  test(`renders correctly in ${displayMode} mode`, async ({ inspector }) => {
    const result = await inspector.renderTool('show-counter', undefined, { displayMode });
    const app = result.app();
    await expect(app.locator('button')).toBeVisible();
  });
}
Each mode has different constraints:
- Inline - Embedded in chat
- Picture-in-picture - Floating window
- Fullscreen - Maximum space, modal overlay
Your app should adapt gracefully to each.
Testing Theme Adaptation
Test both light and dark themes:
import { test, expect } from 'sunpeak/test';

test('adapts to dark theme', async ({ inspector }) => {
  const result = await inspector.renderTool('show-counter', undefined, { theme: 'dark' });
  const app = result.app();

  // Verify dark theme styles are applied
  const button = app.locator('button');
  await expect(button).toHaveCSS('background-color', 'rgb(255, 184, 0)');
});
Testing Across Hosts
sunpeak’s testing framework runs each test against both ChatGPT and Claude hosts automatically. The defineConfig() from sunpeak/test/config sets up Playwright projects for each host.
You don’t need to loop over hosts in your test code. Write your test once:
import { test, expect } from 'sunpeak/test';

test('counter renders correctly', async ({ inspector }) => {
  const result = await inspector.renderTool('show-counter', undefined, {
    displayMode: 'fullscreen',
    theme: 'dark',
  });
  const app = result.app();
  await expect(app.locator('button:has-text("increment")')).toBeVisible();
});
This test runs twice, once against ChatGPT and once against Claude. If it fails on one host but passes on the other, the test report shows which host had the problem.
For full coverage across themes and display modes:
import { test, expect } from 'sunpeak/test';

const themes = ['light', 'dark'] as const;
const displayModes = ['inline', 'pip', 'fullscreen'] as const;

for (const theme of themes) {
  for (const displayMode of displayModes) {
    test(`renders in ${theme} / ${displayMode}`, async ({ inspector }) => {
      const result = await inspector.renderTool('show-counter', undefined, { theme, displayMode });
      const app = result.app();
      await expect(app.locator('button')).toBeVisible();
    });
  }
}
That’s 12 test cases (2 hosts x 2 themes x 3 display modes) from a few lines of code. Each runs against the local inspector in seconds, with no network requests, no paid accounts, and no AI credits.
These same tests run on your CI/CD runners. A GitHub Actions workflow doesn’t need ChatGPT Plus credentials or Claude API keys. The inspector is self-contained.
Visual Regression Testing
Visual regression tests catch unintended UI changes by comparing screenshots against baseline images. Run them with:
npx sunpeak test --visualThis runs your e2e tests and adds screenshot comparison on top. The first run generates baseline screenshots. Subsequent runs compare against those baselines and fail if any pixels differ beyond the threshold.
Visual tests are useful for catching:
- CSS changes that break layout across hosts
- Theme rendering differences between ChatGPT and Claude
- Display mode transitions that shift elements unexpectedly
Because visual tests include E2E tests, you can combine them with unit tests by running both commands. For example, pnpm test:unit && npx sunpeak test --visual runs unit tests, E2E tests, and visual regression tests.
To update baselines after intentional UI changes, run:
npx sunpeak test --visual --updateReview those baseline changes like code. A screenshot update is a product change, especially when the app runs in a constrained host iframe.
Live Host Testing
Inspector tests should be your default, but they are still simulations. Live host tests catch the problems that only appear after the real host connects to your deployed or tunneled MCP server:
- OAuth setup and redirect issues
- Production resource loading and CSP mistakes
- Real host iframe behavior
- Tool invocation wording that does not trigger the expected tool
- Differences between local resource bundles and deployed bundles
Run live tests explicitly:
npx sunpeak test --liveDo not put live tests in the same required CI job as fast inspector tests. They depend on accounts, sessions, host availability, and sometimes model behavior. A good pattern is:
- Run unit, contract, inspector E2E, and visual tests on every pull request
- Run live tests nightly and before release
- Run a small smoke live test after deploy
- Treat live test failures as release blockers when they reproduce
Live tests are not a replacement for inspector tests. They are the last mile check that your real host connection still works.
Multi-Model Evals
All the tests above validate UI rendering. But what about tool calling? A tool description that GPT-4o interprets well might confuse Gemini. Evals test whether different LLMs call your tools correctly.
Evals connect to your MCP server, discover tools via MCP protocol, send prompts to multiple models (GPT-4o, Claude, Gemini, etc.), and assert that each model calls the right tools with the right arguments. Each eval case runs multiple times per model to measure reliability across non-deterministic LLM responses.
Run them with:
npx sunpeak test --evalEvals are not included in the default pnpm test run because they cost money (API credits). You opt in explicitly.
Writing an Eval
Create eval specs in tests/evals/*.eval.ts:
import { expect } from 'vitest';
import { defineEval } from 'sunpeak/eval';

export default defineEval({
  cases: [
    {
      name: 'asks for photo albums',
      prompt: 'Show me my photo albums',
      expect: { tool: 'show-albums' },
    },
    {
      name: 'asks for food photos',
      prompt: 'Show me photos from my Austin pizza tour',
      expect: {
        tool: 'show-albums',
        args: { search: expect.stringMatching(/pizza|austin/i) },
      },
    },
    {
      name: 'uses selected app state for follow-up booking',
      prompt: 'Book this one',
      appContext: {
        structuredContent: {
          selectedAlbum: { id: 'album_austin_pizza' },
        },
      },
      expect: {
        tool: 'book-album-print',
        args: { albumId: 'album_austin_pizza' },
      },
    },
  ],
});
Configure which models to test in tests/evals/eval.config.ts:
import { defineEvalConfig } from 'sunpeak/eval';

export default defineEvalConfig({
  models: ['gpt-4o', 'claude-sonnet-4-20250514', 'gemini-2.0-flash'],
  defaults: {
    runs: 10,
    temperature: 0,
  },
});
Eval Output
Each case runs N times per model. The reporter shows pass/fail counts:
tests/evals/albums.eval.ts
  asks for photo albums
    gpt-4o           10/10 passed (100%)  avg 1.2s
    claude-sonnet    9/10 passed  (90%)   avg 0.8s
    gemini-flash     6/10 passed  (60%)   avg 0.9s
      └ failures: called 'get-photos' instead of 'show-albums' (4x)

Summary: 25/30 passed (83%) across 3 models
Evals are scaffolded automatically by npx sunpeak new and npx sunpeak test init. API keys go in tests/evals/.env (gitignored). See the evals documentation for the full eval reference.
The appContext example is important for MCP Apps. Users often click, filter, select, or edit state inside the rendered UI, then ask the model to do something with that state. Your evals should prove the model can use model-visible app state in follow-up turns instead of guessing or asking the user to repeat themselves.
Running Tests in CI/CD
Add testing to your GitHub Actions workflow:
name: Test
on: [push, pull_request]

jobs:
  test:
    runs-on: ubuntu-latest
    steps:
      - uses: actions/checkout@v5
      - uses: pnpm/action-setup@v4
        with:
          version: 10
      - uses: actions/setup-node@v4
        with:
          node-version: '20'
          cache: 'pnpm'

      - run: pnpm install
      - run: pnpm exec playwright install chromium --with-deps
      - run: pnpm test
In a sunpeak framework project, pnpm test runs the default fast suite. For a standalone MCP server test project, use npx sunpeak test or the package script generated by sunpeak test init.
The testing framework automatically:
- Runs unit tests with Vitest
- Starts the sunpeak dev server
- Runs e2e tests against both the ChatGPT and Claude hosts in the inspector
- Shuts down when complete
No API keys, paid subscriptions, or AI credits are needed on your CI runners. The inspector is entirely self-contained. Your team gets automated cross-host regression testing on every push without any external dependencies.
To add visual regression tests to your CI pipeline, use npx sunpeak test --visual. This runs E2E tests and compares screenshots against baseline images, catching unintended UI changes across hosts, themes, and display modes.
Keep live tests and evals in their own jobs:
  release-checks:
    runs-on: ubuntu-latest
    if: github.ref == 'refs/heads/main'
    steps:
      - uses: actions/checkout@v5
      - uses: pnpm/action-setup@v4
        with:
          version: 10
      - uses: actions/setup-node@v4
        with:
          node-version: '20'
          cache: 'pnpm'
      - run: pnpm install
      - run: pnpm exec playwright install chromium --with-deps
      - run: npx sunpeak test --live --eval
        env:
          OPENAI_API_KEY: ${{ secrets.OPENAI_API_KEY }}
          ANTHROPIC_API_KEY: ${{ secrets.ANTHROPIC_API_KEY }}
          GOOGLE_GENERATIVE_AI_API_KEY: ${{ secrets.GOOGLE_GENERATIVE_AI_API_KEY }}
That keeps normal PR feedback fast while still testing the real model and real host path before release.
Debugging Failing Tests
When tests fail, use these debugging techniques:
Playwright Debug Mode
pnpm test:e2e -- --uiOpens a visual debugger where you can:
- Step through tests
- Inspect the DOM at each step
- See screenshots and traces
Vitest Verbose Output
pnpm test:unit --reporter=verboseShows detailed output including:
- Individual assertion results
- Component render output
- Error stack traces
Screenshot on Failure
Playwright automatically captures screenshots on failure. Find them in test-results/.
Protocol Logs
When a rendered app looks blank, check the MCP protocol path before changing UI code:
- Did
tools/listexpose the tool? - Did
tools/callreturnisError: false? - Did the tool return
structuredContentin the shape your component expects? - Did the tool metadata point at a readable
_meta.ui.resourceUri? - Did the resource include CSP metadata that allows every script, image, font, frame, and API endpoint your app needs?
Most blank iframe bugs are contract bugs, resource loading bugs, or CSP bugs. A scoped Playwright assertion can tell you that the UI is blank, but the protocol log tells you why.
Testing Best Practices
One assertion per test. Keep tests focused and easy to debug:
import { test, expect } from 'sunpeak/test';

// Good: focused test
test('increment button is visible', async ({ inspector }) => {
  const result = await inspector.renderTool('show-counter');
  const app = result.app();
  await expect(app.locator('button:has-text("increment")')).toBeVisible();
});

// Avoid: multiple unrelated assertions
test('counter works', async ({ inspector }) => {
  // Too many things being tested at once
});
Test behavior, not implementation. Focus on what users see:
// Good: tests user-visible behavior
await expect(app.locator('text=5')).toBeVisible();

// Avoid: tests implementation details
await expect(component.state.count).toBe(5);
Use descriptive test names. Make failures self-explanatory:
// Good: clear failure message
test('displays error message when API call fails', ...)

// Avoid: vague description
test('handles error', ...)
Clean up between tests. Reset state to avoid test pollution:
afterEach(async () => {
  // Reset any global state
});
Keep model-facing text under test. Tool names, descriptions, annotations, and schemas are not copy-only changes. They change whether the model calls the right tool. When you edit them, run contract tests and evals.
Test the non-UI fallback. MCP Apps should still return useful text and structured data when a host does not support interactive UI. Test that the tool result is useful without the iframe, then test the richer UI path separately.
Use real-ish data sizes. A table that works with three rows can fail with 300. A carousel that works with square images can fail with mixed aspect ratios. Simulations should include the awkward cases your backend actually returns.
Separate deterministic and probabilistic tests. Unit, contract, E2E, and visual tests should be deterministic. Evals and live model tests measure behavior that can vary, so give them their own pass thresholds, retries, and review process.
If you are starting from scratch, build the first version with sunpeak, then keep pnpm test green as you add tools and resources. If you already have an MCP server, run npx sunpeak test init --server <your-server-url> and add inspector E2E tests before your next release. You will catch more bugs locally, and your CI will cover states that are painful to reproduce by hand in ChatGPT or Claude.
Get Started
npx sunpeak new
Further Reading
- ChatGPT App framework
- MCP App framework
- Testing framework
- sunpeak MCP testing documentation
- sunpeak E2E testing
- sunpeak simulations
- sunpeak evals
- MCP Apps documentation
- Official MCP Apps announcement
- OpenAI Apps SDK reference
- Build one app for ChatGPT and Claude
- Live testing Claude Connectors and ChatGPT Apps
- Mocking and stubbing MCP App tests
- Interactive inspector
Frequently Asked Questions
How do I test a ChatGPT App locally without a paid ChatGPT account?
Use sunpeak to run a local inspector that replicates ChatGPT and Claude app runtimes. In a sunpeak project, run "pnpm dev". For an existing MCP server in any language, run "npx sunpeak inspect --server http://localhost:8000/mcp". You can test display modes, themes, tool invocations, and host rendering without a paid host account or AI credits.
What testing frameworks work with ChatGPT Apps?
sunpeak includes a built-in testing framework. Run "pnpm test" or "npx sunpeak test" to execute unit and E2E tests. Use "sunpeak test --e2e", "--visual", "--live", or "--eval" to target specific layers. E2E tests use Playwright fixtures from sunpeak/test to call MCP tools, render UI in simulated hosts, and return scoped frame locators for assertions.
How do I run ChatGPT App tests in CI/CD pipelines?
Add "pnpm test" or "npx sunpeak test" to CI after installing dependencies and Playwright browsers. Inspector-based tests start the dev server, run against simulated ChatGPT and Claude hosts, and shut down automatically. They do not need host credentials, API keys, or model credits. Keep live host tests and evals in separate opt-in jobs because they depend on accounts or provider keys.
What are simulation files in ChatGPT App testing?
Simulation files are JSON fixtures in tests/simulations/ that define deterministic UI states. They usually include a tool name, userMessage, toolInput, toolResult, and optional serverTools. Use them to test loading, empty, populated, error, cancelled, and follow-up states without calling your production backend or waiting for a model.
Can I test different ChatGPT App display modes with sunpeak?
Yes. The inspector fixture from sunpeak/test accepts display mode options. Call inspector.renderTool("tool-name", {}, { displayMode: "fullscreen" }) to test fullscreen, picture-in-picture, or inline modes. Combine display mode checks with host, theme, viewport, and safe area checks when layout is part of the product risk.
How do I test my MCP App on both ChatGPT and Claude without paid accounts?
Inspector-based sunpeak tests run against simulated ChatGPT and Claude hosts through Playwright projects. Write the test once, and the framework runs it per host. Failures identify the host that broke, which makes cross-host regressions easier to isolate. These tests run locally and in CI without paid accounts.
What is the difference between unit tests and e2e tests for ChatGPT Apps?
Unit tests test component and hook logic in isolation with Vitest and happy-dom. E2E tests use Playwright to call MCP tools, render the app in the inspector, and assert real user-visible behavior. Visual regression tests add screenshot comparison on top of E2E tests. Live tests open a real host. Evals test whether models call the right tools.
How do I debug failing ChatGPT App tests?
For E2E failures, run Playwright with "--ui" to step through the test, inspect nested iframes, and review screenshots and traces. For visual failures, compare the actual screenshot against the baseline and update baselines only after confirming the UI change is intentional. For eval failures, inspect which model called which tool and adjust tool descriptions, schemas, or app context.
