MCP App Tutorial: Build and Test Your First MCP App (May 2026)
An MCP App running in sunpeak's multi-host inspector.
TL;DR: Scaffold a project with npx sunpeak new, build a React component, write a tool, add a simulation file, and run the multi-host inspector with pnpm dev. Working MCP App on localhost in a few minutes, no paid accounts needed. Then add automated tests that cover both ChatGPT and Claude.
An MCP App is a web application that renders inside AI hosts like ChatGPT and Claude. When the AI model calls a tool, instead of returning plain text, your app renders the result as interactive UI: cards, charts, forms, maps, whatever you build with React.
The MCP App standard (ext-apps, now at v1.7.1 with 2,200+ GitHub stars) defines how this works across hosts. You write your app once, and it runs in ChatGPT, Claude, Goose, VS Code (via Copilot), Postman, and MCPJam from the same codebase. In this tutorial, you will build a contact card app from scratch, test it across both hosts locally, and write automated tests.
Prerequisites
You need Node.js 20 or later and pnpm (npm or yarn work too, but this tutorial uses pnpm). You do not need a ChatGPT or Claude account. sunpeak’s local inspector handles everything during development.
Step 1: Create a New Project
Scaffold a project:
npx sunpeak newThe CLI asks you to name your project and pick which starter resources to include. For this tutorial, the selection doesn’t matter because we are building a new resource from scratch. sunpeak creates the project directory, installs dependencies, and sets up TypeScript, React, Tailwind CSS, Vitest, and Playwright.
cd into your new project directory. You should see:
src/resources/where your app UI lives (React components)src/tools/where your server-side tool handlers live (TypeScript)tests/simulations/where mock data lives (JSON)tests/e2e/where E2E tests go (Playwright)
Step 2: Write Your First Resource
A Resource is a React component that renders tool data from the AI host. Each resource has two parts: a config object that describes it to the host, and a React component that renders the UI.
sunpeak auto-discovers resources by directory convention. Any file at src/resources/{name}/{name}.tsx becomes a resource. Create the file src/resources/contact/contact.tsx:
import { useToolData, SafeArea } from 'sunpeak';
import type { ResourceConfig } from 'sunpeak';

export const resource: ResourceConfig = {
  title: 'Contact',
  description: 'Display a contact card',
};

interface ContactData {
  name: string;
  role: string;
  company: string;
  email: string;
  phone: string;
  location: string;
}

export function ContactResource() {
  const { output } = useToolData<unknown, ContactData>(undefined, undefined);

  if (!output) return null;

  return (
    <SafeArea className="p-6 font-sans max-w-sm mx-auto">
      <div className="text-center mb-4">
        <div className="w-16 h-16 rounded-full bg-blue-100 text-blue-600 flex items-center justify-center text-2xl font-bold mx-auto mb-3">
          {output.name.charAt(0)}
        </div>
        <h1 className="text-xl font-bold">{output.name}</h1>
        <p className="text-sm text-gray-500">{output.role} at {output.company}</p>
      </div>

      <div className="space-y-3 text-sm">
        <div className="flex items-center gap-3 px-3 py-2 bg-gray-50 rounded-lg">
          <span className="text-gray-400">@</span>
          <span>{output.email}</span>
        </div>
        <div className="flex items-center gap-3 px-3 py-2 bg-gray-50 rounded-lg">
          <span className="text-gray-400">#</span>
          <span>{output.phone}</span>
        </div>
        <div className="flex items-center gap-3 px-3 py-2 bg-gray-50 rounded-lg">
          <span className="text-gray-400">~</span>
          <span>{output.location}</span>
        </div>
      </div>
    </SafeArea>
  );
}
Here’s what each piece does:
resourcetells the AI host the name and purpose of your UI. See the resource docs for all config options.useToolDatais a React hook that gives your component the data the AI model sent. The generic types<unknown, ContactData>mean we don’t care about the tool input, but we expect the output to match ourContactDatashape.SafeAreawraps your content with proper insets so it renders correctly across display modes (inline, picture-in-picture, and fullscreen).- The
if (!output) return nullcheck handles the brief moment before data arrives. You can replace this with a loading skeleton if you prefer (see error handling patterns).
The rest is standard React with Tailwind classes. Nothing framework-specific about the UI itself.
Step 3: Write the Tool
A resource renders the UI. A Tool triggers it. When the AI model decides to call your tool, the tool handler runs on your MCP server, returns structured data, and the host renders your resource with that data.
sunpeak auto-discovers tools from src/tools/*.ts. Create src/tools/show-contact.ts:
import { z } from 'zod';
import type { AppToolConfig, ToolHandlerExtra } from 'sunpeak/mcp';

export const tool: AppToolConfig = {
  resource: 'contact',
  title: 'Show Contact',
  description: 'Look up a contact and display their card',
  annotations: { readOnlyHint: true },
};

export const schema = {
  name: z.string().describe('Contact name to look up'),
};

type Args = z.infer<z.ZodObject<typeof schema>>;

export default async function (args: Args, _extra: ToolHandlerExtra) {
  // In production, query your contacts API or database using args.name
  return {
    structuredContent: {
      name: 'Alice Zhang',
      role: 'Engineering Lead',
      company: 'Acme Corp',
      email: 'alice@acme.dev',
      phone: '+1 (555) 234-5678',
      location: 'San Francisco, CA',
    },
  };
}
Three exports, each with a specific job:
toollinks this tool to thecontactresource and describes it to the AI model. Theresourcefield is the directory name of your resource (src/resources/contact/). Theannotationsfield tells the host about side effects (this tool is read-only). See the tool docs for all config options.schemadefines the tool’s input parameters using Zod. The AI model reads the field descriptions to decide what arguments to pass. Clear descriptions here improve tool-calling accuracy across GPT-4o, Claude, and Gemini (you can run evals to measure this).- The default export is the handler that runs when the model calls the tool. It returns
structuredContentmatching the shape your resource component expects. In production, this handler would query a real contacts API or database.
Step 4: Add a Simulation File
The inspector needs mock data to render your resource without a live AI host connection. A simulation file defines what the user said, what tool the model called, and what data came back.
Create tests/simulations/show-contact.json:
{
  "tool": "show-contact",
  "userMessage": "Show me Alice's contact info",
  "toolInput": {
    "name": "Alice Zhang"
  },
  "toolResult": {
    "structuredContent": {
      "name": "Alice Zhang",
      "role": "Engineering Lead",
      "company": "Acme Corp",
      "email": "alice@acme.dev",
      "phone": "+1 (555) 234-5678",
      "location": "San Francisco, CA"
    }
  }
}
The tool field is the filename of your tool without the .ts extension. The toolResult.structuredContent object is exactly what useToolData returns as output in your component.
You can create multiple simulation files for the same tool to test different scenarios. A show-contact-not-found.json could test an empty state, show-contact-long-name.json could test overflow, and so on. Each file becomes a selectable case in the inspector dropdown and a reusable fixture for automated tests.
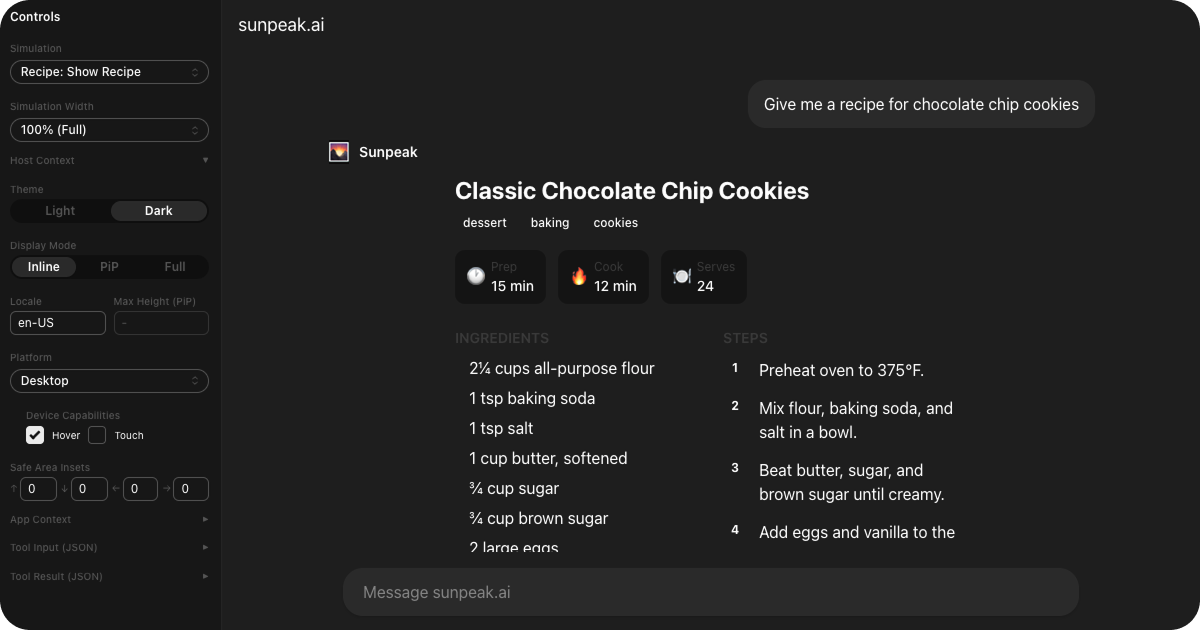
Step 5: Run the Inspector
Start the development server:
pnpm devThis starts the sunpeak Inspector at http://localhost:3000 and your MCP server at http://localhost:8000. Open the inspector in your browser. You should see your contact card rendered inside a chat conversation. The user message “Show me Alice’s contact info” appears in the chat, and your ContactResource component renders the structured card below it, like this:
Test across hosts
The inspector ships with both ChatGPT and Claude host runtimes built in. Use the Host dropdown in the inspector sidebar to switch between them. Your resource renders identically on both because it’s built against the MCP App standard, not a host-specific API. This means you are simultaneously building a ChatGPT App and a Claude Connector from the same code.
Try these other controls while you’re in the inspector:
- Host: switch between ChatGPT and Claude runtimes.
- Display Mode: toggle between inline (inside the chat), picture-in-picture, and fullscreen. The display mode reference covers each mode.
- Theme: switch between light and dark mode.
- Device: test mobile and desktop viewports.
Changes to your component hot reload instantly in the ChatGPT runtime. The Claude runtime rebuilds and shows a refresh notification automatically.
How It Works
The data flow in an MCP App is the same regardless of which host runs it:
- The user asks the AI something (“Show me Alice’s contact info”).
- The model decides to call a tool (
show-contact). Your MCP server executes the tool handler and returns structured data. - The host passes that data to your resource component via
structuredContentover the MCP JSON-RPC protocol. - Your component receives it through
useToolDataand renders it as UI inside a sandboxed iframe.
Your resource is pure UI. It doesn’t call APIs or run server logic. The AI model handles the intelligence, your tool handler provides the data, and your resource handles the presentation. This separation is why MCP Apps are portable: the same component works in ChatGPT, Claude, Goose, VS Code, Postman, MCPJam, and any other host that implements the ext-apps standard.
During development, the simulation file stands in for your backend and the AI host. In production, real tool calls replace the mock data, and your component renders identically because the data shape is the same. For a deeper look at the architecture decisions behind cross-host apps, see How to Build an MCP App.
Add Automated Tests
sunpeak projects come with a full testing framework preconfigured: Vitest for unit tests and Playwright for E2E tests that run against the inspector.
Unit tests
Test your resource component with @testing-library/react. Create src/resources/contact/contact.test.tsx:
import { describe, it, expect, vi } from 'vitest';
import { render, screen } from '@testing-library/react';
import { ContactResource } from './contact';

vi.mock('sunpeak', () => ({
  useToolData: () => ({
    output: {
      name: 'Alice Zhang',
      role: 'Engineering Lead',
      company: 'Acme Corp',
      email: 'alice@acme.dev',
      phone: '+1 (555) 234-5678',
      location: 'San Francisco, CA',
    },
    input: null,
    inputPartial: null,
    isError: false,
    isLoading: false,
    isCancelled: false,
    cancelReason: null,
  }),
  useHostContext: () => null,
  useDisplayMode: () => 'inline',
  useApp: () => null,
  SafeArea: ({ children, ...props }: any) => <div {...props}>{children}</div>,
}));

describe('ContactResource', () => {
  it('renders the contact name and details', () => {
    render(<ContactResource />);
    expect(screen.getByText('Alice Zhang')).toBeInTheDocument();
    expect(screen.getByText('alice@acme.dev')).toBeInTheDocument();
    expect(screen.getByText('Engineering Lead at Acme Corp')).toBeInTheDocument();
  });
});
Run it:
pnpm test:unitThe mock replaces sunpeak’s hooks with controlled data so you test the component in isolation. For a detailed breakdown of mocking patterns, see Unit Testing MCP Apps.
End-to-end tests
Test your resource across both hosts with Playwright and the inspector fixture. Create tests/e2e/contact.spec.ts:
import { test, expect } from 'sunpeak/test';

test('should render contact card', async ({ inspector }) => {
  const result = await inspector.renderTool('show-contact', {});
  const app = result.app();
  await expect(app.locator('text=Alice Zhang')).toBeVisible();
  await expect(app.locator('text=alice@acme.dev')).toBeVisible();
});
Run it:
pnpm test:e2eThis runs your contact card in both the ChatGPT and Claude inspector runtimes and validates that it renders correctly in each. The Playwright config includes both hosts as separate projects, so you get cross-host coverage automatically. You can also run pnpm test to execute both unit and E2E tests together.
For more patterns (display mode testing, theme testing, visual regression, interaction testing), see the complete guide to testing MCP Apps. To add these tests to a CI pipeline, see MCP App CI/CD with GitHub Actions.
Build and Deploy
When you’re ready to ship:
pnpm build
pnpm start
pnpm build compiles each resource into a self-contained HTML bundle and each tool into an optimized Node.js module. pnpm start launches a production MCP server that exposes your tools and resources at an MCP endpoint.
Connect any MCP-compatible host to your server’s /mcp endpoint and your app is live. Point ChatGPT, Claude, Goose, or VS Code at the URL and your users see the same contact card that worked in the local inspector. See the deployment guide for hosting options (Cloudflare Workers, Vercel, Railway, or any Node.js host) and connecting to each host.
Next Steps
You now have a working MCP App with a resource, tool, simulation data, and automated tests. From here you can:
- Add interactive state with useAppState so users can interact with your UI and persist state across messages.
- Handle loading, error, and cancelled states with the full
useToolDatareturn values. - Apply TDD patterns to build new features with test coverage from the start.
- Style your app with host CSS variables for native look and feel across hosts.
- Build a more complex app by looking at real-world MCP App architecture.
- Already have a web app? Migrate it to an MCP App in a few steps.
Get Started
npx sunpeak new
Further Reading
- What Is an MCP App? - architecture, hosts, and how they work
- How to Build an MCP App - cross-host architecture and design decisions
- MCP Concepts Explained - Tools, Resources, and how MCP Apps use them
- Complete guide to testing MCP Apps - unit, E2E, visual regression, and evals
- E2E testing MCP Apps - the inspector Playwright fixture
- Unit testing MCP Apps - Vitest patterns for resources and tool handlers
- MCP App error handling - loading, error, and cancelled states
- How to deploy an MCP App - hosting options and connecting hosts
- MCP App framework
- MCP App testing framework
- MCP App specification - ext-apps open standard on GitHub
Frequently Asked Questions
What is the fastest way to create an MCP App in 2026?
Run "npx sunpeak new" to scaffold a project with TypeScript, React, Tailwind, Vitest, and Playwright preconfigured. Then run "pnpm dev" to launch the local inspector with ChatGPT and Claude host runtimes built in. You can have a working MCP App running in a couple of minutes without any paid accounts or API keys.
Do I need a ChatGPT or Claude account to build an MCP App?
No. sunpeak includes a local inspector that replicates the ChatGPT and Claude App runtimes at localhost:3000. You can build, test, and iterate entirely offline without any AI host accounts, API keys, or credits. You only need host accounts when you are ready to deploy your finished app to production.
What is the difference between an MCP App resource and a tool?
A resource is iframed HTML (built from React) that renders UI inside the AI host. A tool is a server-side function the AI model calls to trigger that UI. The tool handler runs on your MCP server, returns structuredContent, and the host passes that data to your resource component via the useToolData hook. One resource can be triggered by multiple tools, and each tool has a Zod schema that tells the model what arguments to pass.
How do I test an MCP App across ChatGPT and Claude locally?
sunpeak's inspector ships with both ChatGPT and Claude host runtimes. Use the host dropdown in the inspector sidebar to switch between them. For automated testing, use inspector.renderTool in test files (sunpeak/test with Playwright) to assert your UI renders correctly on both hosts. Tests run against both hosts by default via Playwright projects, so you get cross-host coverage automatically.
What is a simulation file in sunpeak?
A simulation file is a JSON file in tests/simulations/ that contains mock tool data for local development. It defines the tool name, user message, input arguments, and structuredContent result. The inspector loads these files so you can develop and test your UI across every possible state (success, loading, error, cancelled) without connecting to a real AI host or spending credits.
Can I use an MCP App in ChatGPT, Claude, Goose, and VS Code from the same codebase?
Yes. MCP Apps are built on the ext-apps open standard, which ChatGPT, Claude, Goose, VS Code (via Copilot), Postman, and MCPJam all implement. Code using standard APIs (useToolData, useHostContext, useDisplayMode) runs on every host without changes. sunpeak builds resources as self-contained HTML bundles any MCP-compatible host can render.
How do I deploy an MCP App to production?
Run "pnpm build" to compile resources into self-contained HTML bundles and tools into optimized Node.js modules. Run "pnpm start" to launch a production MCP server exposing an /mcp endpoint. Point ChatGPT, Claude, or any MCP-compatible host at that URL. sunpeak supports deployment to Cloudflare Workers, Vercel, Railway, or any Node.js hosting.
What languages and frameworks does sunpeak support for MCP Apps?
sunpeak uses React for resource components (the UI that renders inside AI hosts) and TypeScript for tool handlers (the server-side logic). Projects include Tailwind CSS and 20+ typed React hooks (useToolData, useAppState, useTheme, useDisplayMode, useCallServerTool, and more). Tool handlers run on Node.js and can call any API or database.
What testing options does sunpeak provide for MCP Apps?
sunpeak includes a full testing framework: unit tests with Vitest for components and tool handlers, E2E tests with the inspector Playwright fixture for cross-host rendering, visual regression tests for catching UI drift, integration tests at the MCP protocol level, and multi-model evals that verify LLMs call your tools correctly. All tests run without paid accounts or AI credits.
